Settings
Overview
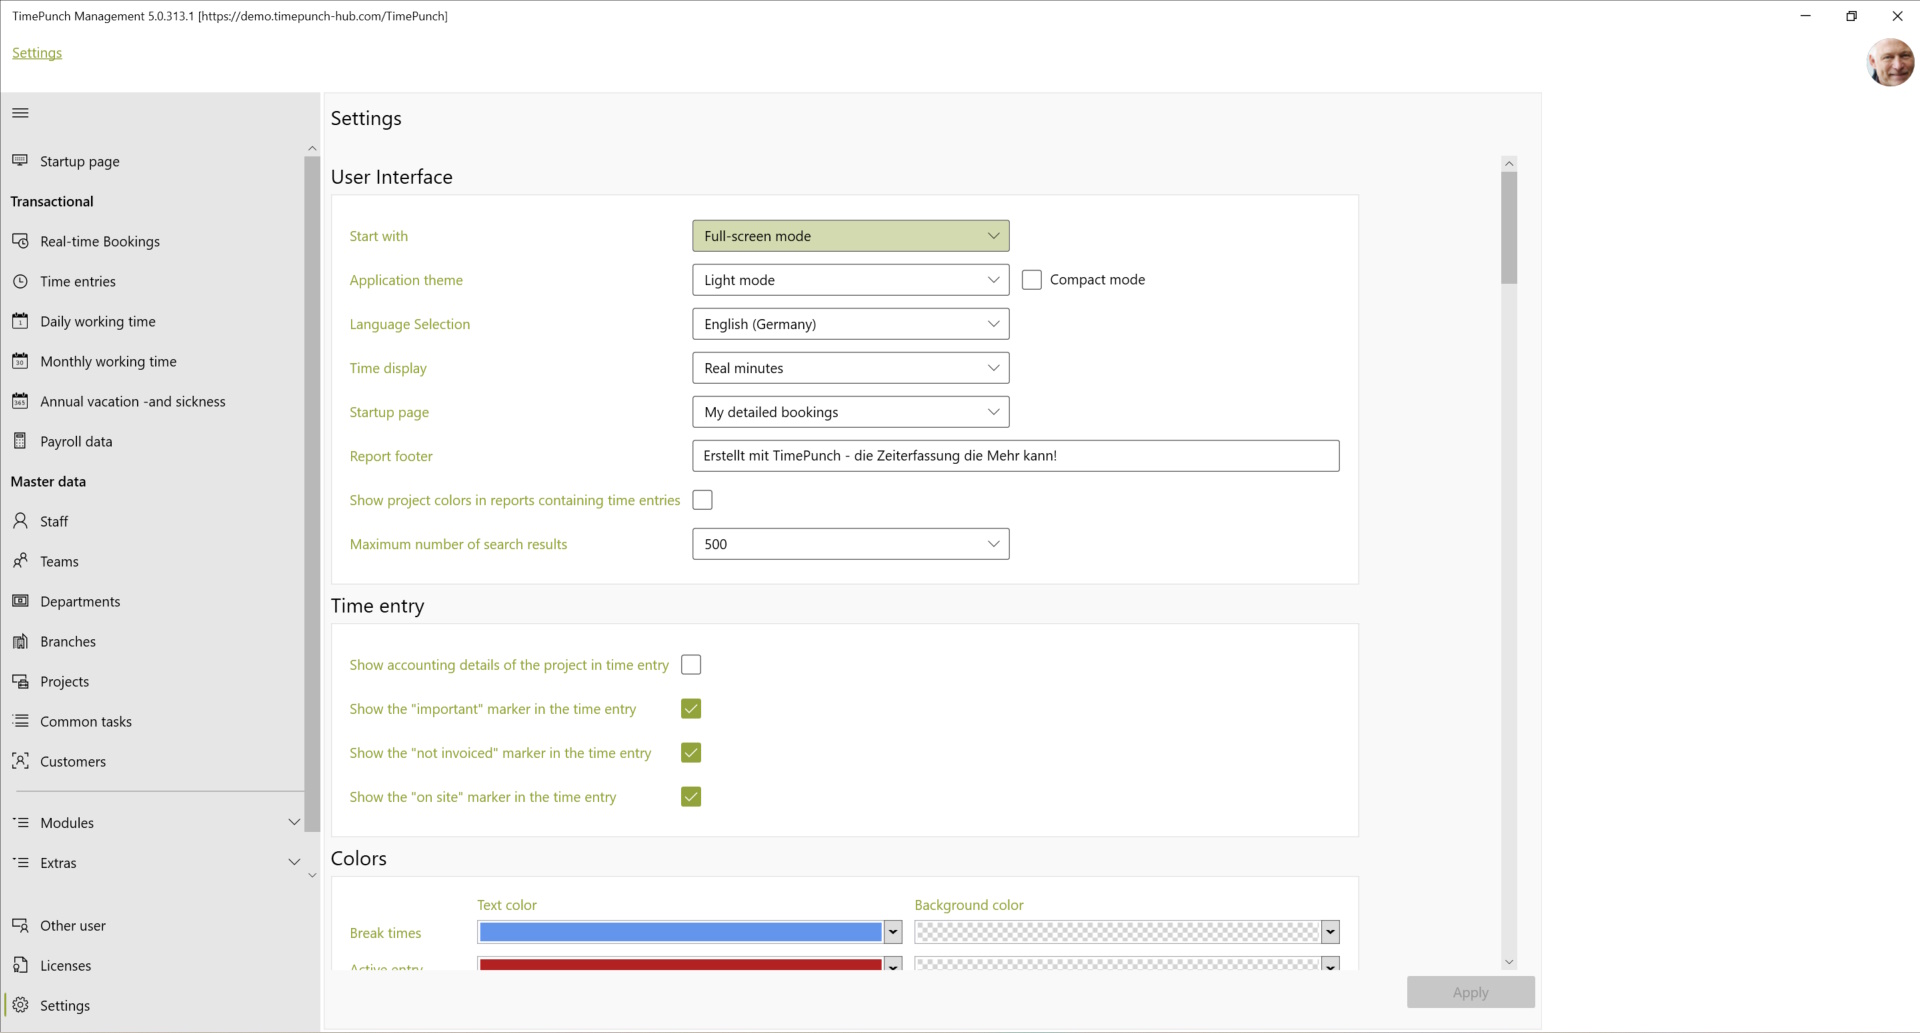
The possible settings of TimePunch can be found in the navigation bar at the bottom left, under the item "Settings". Depending on the user's authorisation, more or fewer setting options are displayed.
User interface
Start in : Here you can select whether TimePunch starts in full screen or window mode.
Application mode : The application mode determines whether a dark or light colour scheme is used.
Language selection : The display language as well as the date and currency formatting can be selected in the language selection.
Time display : The time display defines whether time values are displayed with industrial minutes or in real minutes.
Home Page : This setting defines which data TimePunch displays immediately after start-up.
Report footer : The text in the report footer is printed at the end of each report.
Display project colours in reports with time entries : This setting determines whether the project colours should also be used in the reports.
Maximum number of search results : In this selection list you can set how many search results are returned by the integrated searches. This applies, for example, to the search for employees, projects and customers.
Time entry
Show accounting information of the project in the time entry** : This setting defines whether the employee is shown the be shown the project's accounting information during online entry.
Show the important marker in the time entry : Defines whether employees can mark the time entry as important.
Show the Not-Calculated marker in the time entry : Defines whether employees can mark the time entry as not calculated.
Show the on-site marker in the time entry : Defines whether employees can mark the time entry as on-site.
Colour selection
The colour selection can be set individually for the user. The following options are possible here:
Break times : This colour determines how the break times between the working time entries are displayed.
Active time entry : This colour determines how the active time entries are displayed. Active entry means the current recording of the working time.
Missing days : This colour determines how missing days are highlighted.
Changed entries : This colour determines how manually changed time entries are highlighted.
Data preview colour : This colour determines how the automatically calculated working times are highlighted. The precalculation of time entries can be set in the settings under "Internals".
Recording
This tab determines how time entries are recorded by TimePunch.
Recording mode :
- Full time recording with pause mode : In this mode, the user is free to change or restart the project, stop or pause the recording.
- Simplified start/stop time recording** : With the simplified start and stop time recording, the user can change or restart the project and stop recording. A pause is implemented by stopping and restarting the time recording.
- Automatic time recording and project selection only** : In the simplest mode, the user can only select a new project and start it. A manual break can no longer be inserted. However, automatic breaks are still recorded (e.g. when the screen saver is activated). This setting also prevents accidental recording gaps by stopping the time recording.
Start time recording when the Watcher is started and stop it automatically when the Watcher is closed : If this setting is set, time recording starts immediately after logging on to the PC. In this case, logging starts with the previous day's project. This item also causes the logging to be stopped, that logging is stopped as soon as TimePunch Watcher is closed.
Set start project : In TimePunch, the respective start project can be set in the TimePunch Watcher. The start project determines with which project/activity the first recording is to be started.
Remind project update : With this option, TimePunch can remind you to check the time recording. Especially if the projects / activities are frequently changed during the day, it can be useful for TimePunch to remind the user to check their own activity by showing the window.
When Windows is locked : With this setting, you can define how TimePunch behaves when Windows is locked. The following options are available:
- Pause time recording** :TimePunch goes directly into pause mode after Windows is locked and continues automatically as soon as the PC is unlocked again.
- Ignore absence for 5 to 30 minutes** :With this option, time recording continues until the set time is reached. If the PC is still locked after this time, the complete time from locking the PC until logging in again is calculated as a break.
- Do not interrupt time recording** : Even if the PC is locked, time recording continues unless you manually switch to pause mode.
But no matter which setting is chosen: As soon as the PC is locked for more than 6 hours, the time entry is interrupted. The end date is the time of the lockout. Note: The screen saver also locks the PC. This setting can therefore be used to ensure that an activated screen saver is automatically entered as a pause time as soon as the specified time period has been exceeded.
Recording accuracy : This setting determines the rounding of the start and end time during time recording. The default setting is to record to the minute. However, especially for craft businesses, it can be useful from a billing perspective to set the rounding accuracy to 5 minutes or higher.
GPS Tracking : Currently, location tracking is only possible for the online version of TimePunch. However, here you can then set how the GPS data should be plotted. The following options are available.
- Never** : TimePunch will not record GPS data. Not even if the setting in the smartphone would allow this.
- On demand** : GPS data recording is optional in TimePunch. If the setting in the smartphone allows it, there is no request to the employees. In case of demand, employees can allow or prohibit it.
- Required** : In this mode, the recording of GPS data is mandatory. If employees refuse the recording by deactivating the option on the smartphone, the time recording can neither be started nor stopped.
To change the settings for several employees at the same time, the employees must first be marked in the list. Afterwards, the settings can be changed for all marked employees.
Automatic registration
This page determines whether and how new employees can connect to TimePunch.
Perform automatic licence allocation : If this option is activated, free licences are automatically allocated to new employees. Although this can be convenient, it is not always desired.
Example: There are 5 TimePunch PRO licences available. However, only two licences are currently assigned to the personnel office. If another employee tries to connect to TimePunch PRO (who, for example, only has a data entry licence), a new licence is automatically assigned to him, provided that this checkbox is active. This behaviour can be quite problematic in larger companies and can therefore be turned off here.
Allow self-registration of new employees : If this option is active, the option to switch to registration is displayed in the login dialogue. If an employee is not in the selection list of possible employees, he/she can create and register him/herself in TimePunch. This option can also lead to undesirable behaviour in larger companies if employees can register themselves even though they may have already been created by the HR department. By deactivating the option, the button "Switch to registration" is omitted. In this case, employees can only be newly created by the HR department in the master data.
Default authorisation for new employees : This selection box determines which rights new employees receive when they create themselves in the system via self-registration.
Automated mails
This tab determines which mails are sent automatically to which recipients.
Core time violations : Here you can define the mail recipients who are to be informed in the event of a core time violation.
Audit of changes to time entries : This area defines mail recipients who are informed when changes are made to existing time entries.
Monthly closure : If a monthly closure is carried out, the employees can be informed by e-mail according to the settings.
Automated terminations and reinstatements : With the help of this option, employees can be informed by mail when terminations and reinstatements are carried out.
Internals
Continuation of pay : This setting defines how holiday pay, sick pay or continuation of pay on public holidays is to be calculated.
- If this setting is selected, the employee is credited with the wage as holiday pay that is also reflected in the target working time of the working time model.
- Corresponds to the average earnings of the last 13 weeks : This setting conforms to the current legal situation in Germany. The holiday pay is calculated from the average earnings of the last 13 weeks. See also: https://www.gesetze-im-internet.de/burlg/__11.html
- Corresponds to the average earnings of the last 6 months : As a further option, the average continued pay can also be calculated according to the earnings of the last 6 months.
Note. If a change in the calculation logic is to be made, all old months must be closed (Extras / Month-end closing). Only then can the calculation logic be changed over without fear of changing the overtime. If the calculation logic is changed without a previous month-end closing, this may lead to a recalculation of the working time and a change in the overtime account.
- Minimum is the payment of the regular target time : This option specifies that the salary continuation cannot fall below the regular target time. This may be the case, for example, if an employee has been sick (unpaid) for an extended period of time or has taken an unpaid sabbatical.
Overnight entries : TimePunch knows two different models for displaying overnight entries.
- Split overnight entries : In this mode, overnight entries are split between the two working days. For example, if an entry starts at 10 p.m. until 6 a.m., then 2 hours are booked on the first day and 6 hours on the second day.
- Combining overnight entries : In the standard setting, overnight entries are assigned to the day on which they were started. This setting increases clarity for employees.
Calculation logic :
Overbooking of planned working time : With this feature it is possible to overbook the defined planned time of a working day with holiday, illness or other absence types. This may be necessary if the stored target time does not correspond to the actual working time of the employee.
Data preview for the current month : If this feature is activated, TimePunch uses an internal projection for the days not yet booked. As a result, the data in the current month is displayed as if the employees would work the rest of the month with regular target time.
Employees : The following employee-specific settings can be set.
- Employees can reassign break : If this checkbox is set, employees without special editing rights can also assign a break time entry to a project. The start and end of the break can still not be changed for employees without special editing rights.
- Project managers can assign employees : This setting allows project managers to change the employee assignment to the project, i.e. to assign employees to the project. If this checkbox is not set, only employees with administration rights can authorise employees to the projects.
- Prevent creation of master data during import: If this option is activated, all projects and activities must already exist in TimePunch when importing time data from the CSV format. If this is not the case, the import is aborted with an error message. By default, this option is deactivated, i.e. the referenced projects/activities from the CSV file are automatically created in TimePunch.
Project settings : The following project-specific settings can be set.
- Access rights for new projects : This setting defines with which access rights newly created projects are created.
Surcharge-relevant times
In this dialogue, the periods can be defined for which separate wage types are used during the wage data export.
Night surcharge : The night surcharge is optional in TimePunch. Therefore, the settings made here are only used if a corresponding wage type for the night surcharge has been set in the DATEV export.
- Night Surcharge Start : The time set as Night Surcharge Start is used to calculate any night surcharge.
- Night Surcharge End Core Time : The core time for the night surcharge is the time from 0:00 to the set time. During this time, an increased night surcharge may be paid.
- Night Surcharge End : The time specified as Night Surcharge End is used to define the end of the night surcharge.
- Saturday supplement split (morning / afternoon) : For Saturday, different wage supplements can be claimed for the morning and the afternoon. The splitter only defines up to when the morning supplement starts and from when the afternoon supplement starts.
Overtime surcharge : Overtime surcharge can be calculated on a daily basis or on a monthly basis. In both cases, it can be specified whether an overtime bonus is paid from a fixed working time or according to the employee's individual planned working time.
- Example per day : A 37.5 hour week is defined for an employee. This means that the target time per day is 7.5 hours. An overtime bonus is fixed from 8 hours onwards. This means that the employee only receives an overtime bonus if his/her real working time exceeds 8 hours.
- Example per month : The employee has a real working time of 170 hours. From 160 hours an overtime bonus is paid. He/she is therefore paid 10 hours separately.
Note To ensure that overtime bonuses are actually paid, the overtime (special bonus) must be activated in the wage data.
Wage and salary payment
In this dialogue you can determine which system is used to export the wage data and to which wage types the posted times are to be exported.
Wage data
If special bonuses are to be paid, e.g. a night bonus, the checkbox Night bonus must be set and a corresponding wage type must be entered.
Note The wage types can also be stored in the employee profile per employee. The specific settings then overwrite the global settings from the Extras / Options dialogue.
Statistics wage types
Since holidays, sickness and the working time account are managed in TimePunch and not the payroll software, statistical data can be exported to the payroll software in addition to the regular wage data.
This statistical data has no influence on the salary calculation, but it can be printed by the payroll software on the salary statement for the employees.